Showing posts with label wiring. Show all posts

Monday, May 8, 2023

Vehicle powered

 New wiring harnesses all hooked up. Still a lot to do, and I know there are problems yet to find, but we're rolling. 


Friday, August 21, 2020

Bits and pieces

The new Dynon 160 label maker came (as suggested and reviewed in Kitplanes), I had drug my feet as long as possible because the old one used 1/8" heat shrink tubing, but all I could find in the new one was 1/4". Turns our they're both the same size, somehow, and the 1/4" fits fine.


As did the new, smaller LED indicator lights from Oznium. With the bigger, more aesthitcially pleasing lights I have to add a 10k ohn resistor to balance between an acceptable level of day and night brightness, but the smaller ones have the resistor built-in, and a colored lens to show up better.


But, frustratingly, the 2 piece connector I got is too big to fit through the 8mm hole of the smaller indicator. Going to put that in the "Step away and think about it." pile while we move on to other things for a while. 


Wednesday, August 12, 2020

Opportunities come from misteaks.

With all the puttin' together and takin' apart I accidentally broke the connector to the Dynon Skyview backup battery. But... in my search for a replacement, a light went off and I thought Hmmm.... if that carries power from a battery to the Skyview, then it should be able to carry more than enough power for a LED. Looks like the OAT sensor uses the same type of connector, and it looks like it would fit in an Oznium 11mm LED sized hole.


Yup. Kewl. 


A quick post on the Dynon forum yielded the part number for the OAT sensor connector, a followup call to Mouser yielded the part number for the 3 hole backup battery connector, turns out they're rated for 5A, 600V. Hot stuff, they'll be here Friday, in time for some good weekend work.

 Best part, they're only $0.32 each. Whoo-hoo!!

Thursday, August 6, 2020

Blinded by the light

Now that we're working in the front avionics compartment again, I was reminded of an old saying that goes along the lines of "Sure, you can install it, but can you fix it once you install it?" With that in mind a quick fit check to make sure that I could get to the stuff I'm now working on. Yes, I do have access. All is well.


During the Quest for the Perfect LED Indicator, I came across some lights by Oznium. Aesthetically, they were very nice. But they were blindingly bright, even in daylight.

Oznium suggests I put a resistor in the circuit to lower the voltage and dim the lights, I checked with Rotax, Dynon, and ACI, and all said it was Ok to put a resistor on the ground/return side of the LED in their systems. Since the gear lights all hook into a common, pigtailed ground that was a perfect spot to test.

A dsub connector made the pigtail removable.

And connectors on each side of the resistor made it plug-n-pray. A gent on VAF had the same problem as I did and suggested a 10k ohm resistor. My first try was discouraging because I used a 10 ohm resistor, it was kindly pointed out that I missed the size by a factor of K. (Missed it by THAT much.)

Huge difference when you use the correct size.


Still a little brighter than I'd like for night flying, but I won't be doing a lot of that, and I can live with it.


...

Sunday, July 26, 2020

Listen to the airplane

With what I consider the hardest part of the rewiring job over, it was time to turn to easier ones. I only had a day before I had to leave on my next trip, so I wanted to just go in and look at some wiring that had perplexed me on the right side of the nose. Put the kettle on, turned on a little Enya, and I had full intention of working on those puzzling wires, but instead, like a cat trying to show you exactly where to scratch them behind the ears, the airplane drew me to the left side of the avionics compartment, and I spent some time rerunning some wires to the master solenoid.


In a very mellow frame of mind, and having moved on to some new Willie Nelson, I took a look at those wires.


and came up with a simple solution. Had to stop there and go to work, but it's waiting for me, and I patted Osp on the nose before I left, and thanked her. 


Sometimes, the airplane leads you where and when you need to go.

Saturday, July 25, 2020

The Big Snip

Since i had all the wire bundles opened up, it was an opportunity to add labels to the wiring. Yes, this is an ancient label maker, I've since found out one roll of this heat shrink could have bought a new maker and a couple rolls of tape. (but it did make 1/8" heat shrink tubes, which the new one I've got on order does not.


Hopefully I'll never be reopening the bundles, but if I do, it will be easier to sort through them. I'll shrink them down later when I'm tying the bundles up.


More Adel clamps, these to run the wires under the radio rack to the left side of the panel. These are big ones for ease of installation, later I'll be replacing them with smaller ones that do not allow the wires to move. 


And it's time to check everything two, three times, and start cutting. 


Much nicer.


I've needed a way to make quick disconnects of wires, with the small amount of room behind the panel and size of some of the opening the standard, large plastic multi-connectors were not an option.  I'm not sure if there's any problem the VAF have not figured out, but it was suggested to just use d-sub connectors, wrapped in heat shrink. For some reason dsubs intimidated me, which meant it was something I needed to learn.


Yes, at 59 my eyes aren't 15/15 anymore, but those dubs are SMALL!!!


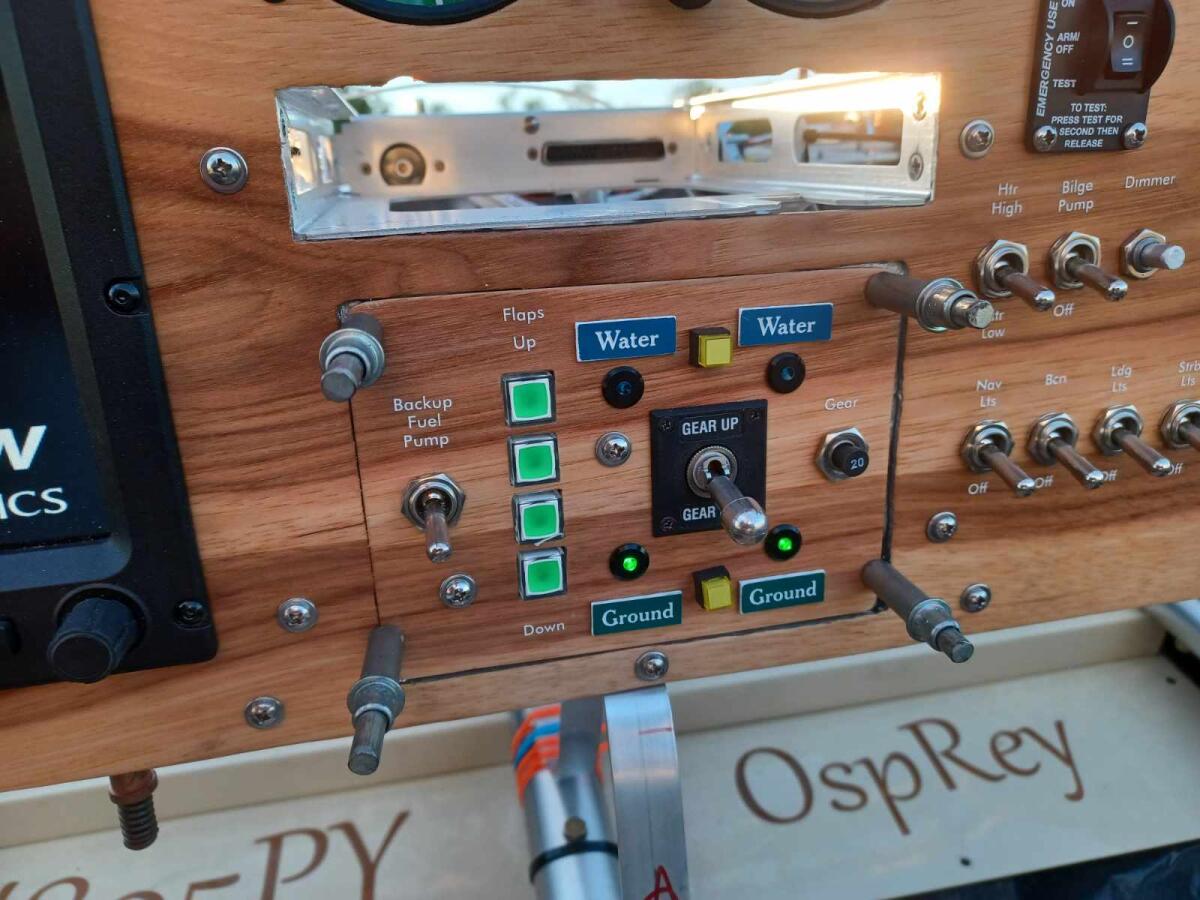
Warning lights all dressed up. Note that to fit through the hole they have to be staggered.


One persons suggestion was to put heat shrink around the connectors, then tie them off with wire lacing cord instead of heat shrinking them. 


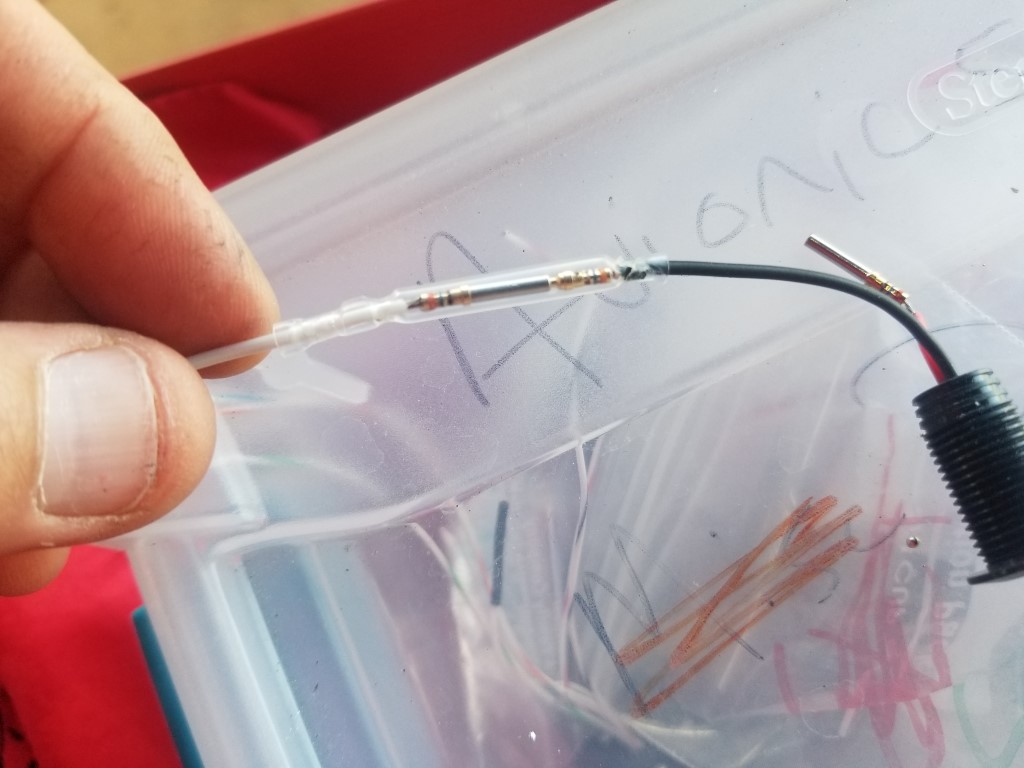
When I got to adding the connectors to the landing gear warning system alert lights and its itty, bitty wires/mounting holes, the tie-off-heat-shrink method was impractical because of it's bulk.


I tried knife/handshake connectors, also far too bulky. Things were looking grim. 


The solution (again, tip of the balding head to VAF) was clear heat shrink, carefully shrunk with the tip of the soldering iron on each end to hold it in place.


You gotta be cautious with the iron, but not too cautious. If you stay too far away from the connector the wires can separate, something I would not have noticed had I not been using clear heat shrink (Clear heat shrink has become my new favorite invention.) and would have been a nightmare to troubleshoot.


In the meantime, the area under the radio where the landing gear and flap selector is was a wiring nightmare. It took 3 days. Wish I could figure out a way to make this into a separate panel and removable, if we end up redoing the panel again it will be solely to do so. TJ may may have an idea, and knowing him, will whip out a new panel in a matter of minutes. (Ok, maybe not minutes, but very quickly.) Actually since writing this I'm even more convinced that I need to make it removable, and think I know how. It won't look as nice, aesthetically, but if I don't and I need to make a repair in the future I'll either have to pull the entire panel, or swear a lot doing the repair.


There's a small terminal strip off the starter switch that feeds a few systems,


a visit to my old RC airplane toolbox yielded some 4-40 blind nuts to mount it with. 


I was deep into the landing gear sub-pane one day when someone yelled from the gate, asking to be let in. I was NOT having a good day and did not want to get distracted with someone who just wanted to banter and distract with the usual So when's it gonna fly? harharhar... comments. I yelled out the code (since they had called me by name), but a few minutes later heard a familiar voice saying "She's looking good, Steve.". I was delighted to see an old friend, Hal Beatty, who was one of my mentors at the Heritage Flight Museum and had retired last year. A bad day suddenly got better.


Hal was driving an old Ford he had just completed restoring. That's not a restoration, it's a work of art.


Ok, Power up again. I've got a small electrical glitch to chase (there always is) but so far it looks like I did all the other connections right.


One embarrassing thing happened, though. I had gone over what I thought was EVERY switch, checking that they were all Off, but missed the landing gear switch. I had the breaker pulled, and must have thought that was the switch, too, so after initial powerup I started turning systems on, one at a time. To my horror, as soon as I pushed in the gear cb the left main started retracting, but I was able to quickly yank it back out before it got too far. Luckily, a hangar neighbor was there, and we both were able to lift Osp up enough to allow the gear to reverse and get back down in the locked position. Jim laughed his ass off about it when I told him, had me check a couple things, and luckily there was no damage except to my wounded pride. Lesson learned.

Friday, July 17, 2020

Groundhog Days

"What are you doing today, honey?"
Working on the electrical system.
"Didn't you work on that last week?"
Yes.
"What are you working on next week?"
The electrical system.


We're getting there, we're getting there, and we've come a long way (I know not to touch both terminals of a capacitor at once, for instance). Will start the final trimming tonight, may be able to power her up again this weekend.


I'll explain this later


....