Sunday, March 22, 2020

Switching around

Originally I ordered Fast-on switches, which I found out really meant "Fast on, Never off." After ruining some wires trying to remove & replace wires, I decided to change to switches with screw mounts. Means redoing the wires, but will make repairs a lot easier.

These are available at SteinAir.


Thanks to the Vans Air Force

Much as I like my Seagulls, I've found that another group of pilots, the Vans Air Force, have a huge resource of knowledge and have been very welcoming to me asking questions on their forum. Appreciate it, gang.

Thursday, March 12, 2020

"I don't know." is not an acceptable answer to a USN Chief (ret.)

Syd: What does this wire do, Steve?
Me: I don't know.
Syd: (looks at me)
Me: I will know next time I see you.


Wednesday, March 11, 2020

The cockpit was my office

 Panel temporarily mounted in place, it will be held from overhead by the nosedeck, but this allows me to work on the wiring. 


And put everything (or as much as possible) back in place.


Spaghetti, Part ????

Sunday, March 1, 2020

New panel in progress

It may not look like it but there's a huge difference from this


to this. Very happy with my progress.


Still cold, but good enough weather for outdoor cookin'....


back scratches,


an airshow


and soaring. 


With the wiring sorted out it was back to working on the panel. I had been thinking about doing a 3 piece removable panel mounted to a frame, but the weight and complexity stymied me. I know there's a way to do it, but I'd rather go with a tried and true solution and get going. Paper template transferred to cardboard


and fit checked. 


drawn on some .063" 2024T3


and cut. My new favorite tool, it cuts faster than a sabre saw, which is good (job is done faster) and bad (easier to f-up and make a terminal error in the cut.).


All that other cutting wasn't for waste, practice makes perfect, things fit better and were cut faster this time.


Something that REALLY made me nervous  was bending the side panels. Had to get it right the first time, and I measured,


and remeasured


until my hangar neighbor Jerry kindly showed me how to bend it on his brake.


Perfect. (in retrospect I wish I hadn't drilled the left side panel until after I bent it, but I was worried about trying to drill it after being bent. Oh well, the changes I would have made are not significant.) Off to work for about 2 weeks, things will start moving quickly now. I hope. 


I missed it over the winter, but a little bit more than 30 years ago I started flying fixed wing airplanes. Never in my wildest dreams did I dream I'd be flying a 300+ passenger, 3 week old 787 for a living.


Company policy about social media is pretty restrictive so I won't post who I fly for, but check out this shiny clean landing gear!!!

Friday, January 24, 2020

Do. (then undo, redo, reundo, etc....)

There have been reports of the plastic stick and rudder supports breaking, and a very talented SeaRey builder machined some replacements. On a day I didn't feel like working on the electrical I removed the stick mounts and replaced them. This also gave me an opportunity to replace the seat brackets I had weakened with rivnuts. Replacing the rudder blocks will require undoing the front cockpit, so we'll do that after the electrical is organized and the avionics tray is sent out for anti-corrosion treatment,


 Progress is being made on the wiring. I've been taking my time, going through and reorgainzing them so I can easily repair them after the nose deck is assembled. I've also been working on the documentation so I'll know what does what in case I have to repair things 5-10 years from now.


Take a wire, trace it, zip tie it with others. Take another wire, unthread it, take the first bundle apart since they're tangled together, sort them out, Ziptie them. Start on the next bundle. Step back, think about what you're doing. Make some notes. Take a break.  Ask Syd a dumb question and get a "You can figure that out yourself, Luke. You'll learn more that way." look.Go for a walk around the airport for exercise and think about it. Jump back in. On a good day, it's almost a Zen state of grace after a while.


Monday, October 21, 2019

Saturday, October 12, 2019

Shiny!!!

Note to self: when taking photos of wire locations/labels, make sure camera is in focus before moving on.


Like this.


Wires all removed and organized, there's my trophy fish.


With the layout roughed out, it was time to replace the cardboard with the real things. Even then, I still (almost) screwed up, only blind luck saved me. More on that later.


One thing we tried was having the power buss backwards so the wires could be ran along the back of the shelf, but with the nosedeck on I found I could not reach or locate the terminal connections, so that idea got squelched. Note how all the wires got ziptied or taped together according to their destination (buss 1, 2, ground, etc), or function.


And with final locations determined, it was time to start drilling.

*gulp*


THAT was a late night, but I tend to be nocturnal, and once I get in a groove I like to keep going. Note also the new ARTEX 345 ELT. (Me: I was thinking about this ELT. Syd: You're not getting that one, you're getting this one. Me: Ok.)


Nutplates vs nuts were a big debate. TJ hates nutplates because of dissimilar metal corrosion between the steel nutplates and aluminum structure, but Syd & I held firm that they were almost mandatory for field repairs. We came to a compromise: nutplates, but before they were mounted the shelf would be epoxied so there would be no dissimilar metal contact. Fair enough.

I wasn't going to buy a jig just for drilling the nutplates, now I wonder how I did without. SO much easier!!


Shiny!!


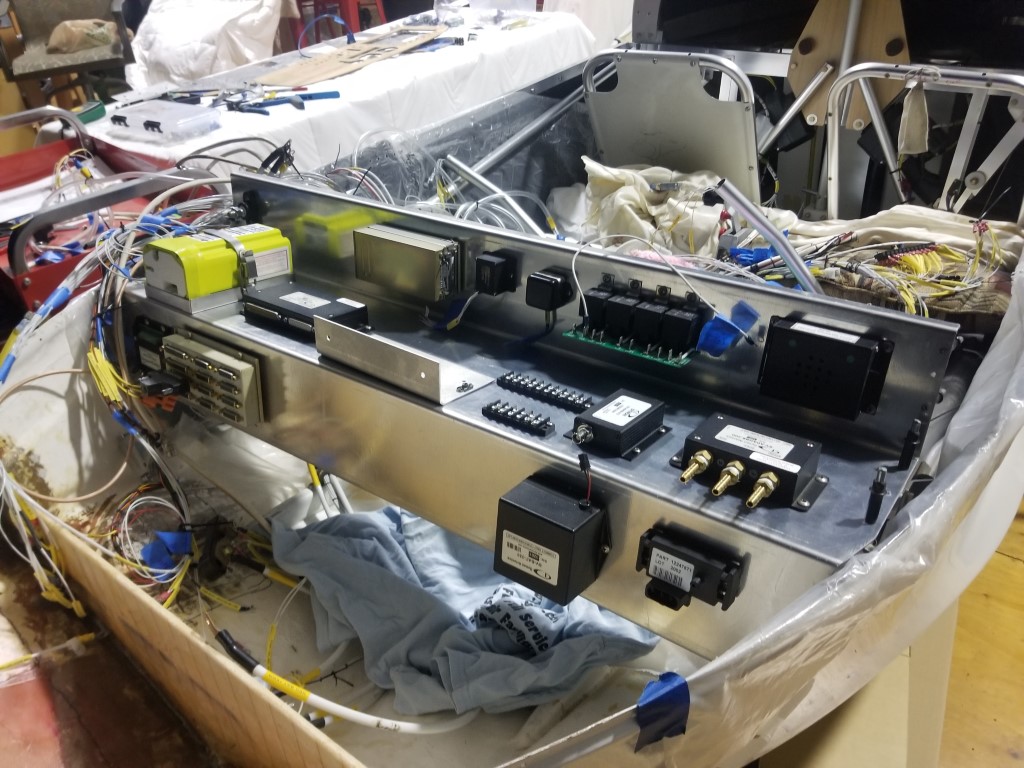
With the parts mounted, it was time to run wires. Here's where I almost messed up. You can see the transponder in the upper left of the tray, I was going to put the capacitor to it's left but forgot to drill the holes for the clamp. Had I done that, there would have been a conflict between the capacitor and the cable coming out the transponder. Dumb luck that I forgot about the capacitor, but I'll take that. Instead, it's going to go in the center of the panel on the lower shelf between the backup battery and the Fastack hub.


Just for fun, here's how da big boyz do wiring. Wonder how much they charge for those zipties?


...

Tuesday, September 17, 2019

Mmmm... Spaghetti....

To do, you must undo. So with a fresh blade in my X-acto knife, and a mostly steady hand, it's been time to take wiring bundles apart. The replacement of some avionics necessitated the rearrangement of the layout, meaning wires had to be re-run, so the bundles had to be taken apart and redone.


You don't want to know how many times I've rearranged those cardboard cutouts. Thought I had it all laid out, only to find out the wires did not reach, or were in each others way, or... Since once of the purposes of this redo is to make it more easily field reparable, I'm taking a lot of time to pretend "Ok, this broke. How can I get to it?"


Friday, September 6, 2019

Hire the best, then get out of their way.

Our schedules finally matched up and TJ made it out to help bend metal.


A local pilot owns a boat building shop. There was a sign inside I loved, it said "No smoking, no loafing. State your name, you job, and GET OUT. We have work to do." 


It was unbelieveable how fast those guys did what would have taken me all day or more to do half as well.


"What can I do to help?"
 "Leave."
"Ok."


 An hour later he was packing his tools, the new mount was perfectly fitted, and the gunslinger was on the way to the next town. I'm undoing the lacing in preparation for rearranging the wire bundles.The cardboard pieces are mockups of the various black boxes that will be fitted. CAD/CAM is great, but sometimes it's better just to have a physical piece of something to move around and check with.


TJ also left me with some other work. Though he trusted my glassing job, he hinted that he'd really like to see a 4" layer of glass around the bulkhead, just to be safe. No worries, I'm getting good at glassing again. 


He also pointed out how little of the bow reinforcement plate was actually touching the hull, so I made up a slurry and glassed the plate in place. 


Time to pay the piper, off to work I go for the next few weeks, but on the way I could not resist stopping and seeing the 737Max parking lot.


.....