
Sunday, September 25, 2011
Mike's RV
Saturday, September 24, 2011
A baby go-fast lever
Continuing to work on the throttle assembly, I had planned on replacing the stock backplate but it turned out to require more machining expertise than I was capable of. Instead I drilled the angle for the holes in the stock backplate, and attached the quadrant to the angle.

After that it was a matter of carefully grinding it down, bit by bit.


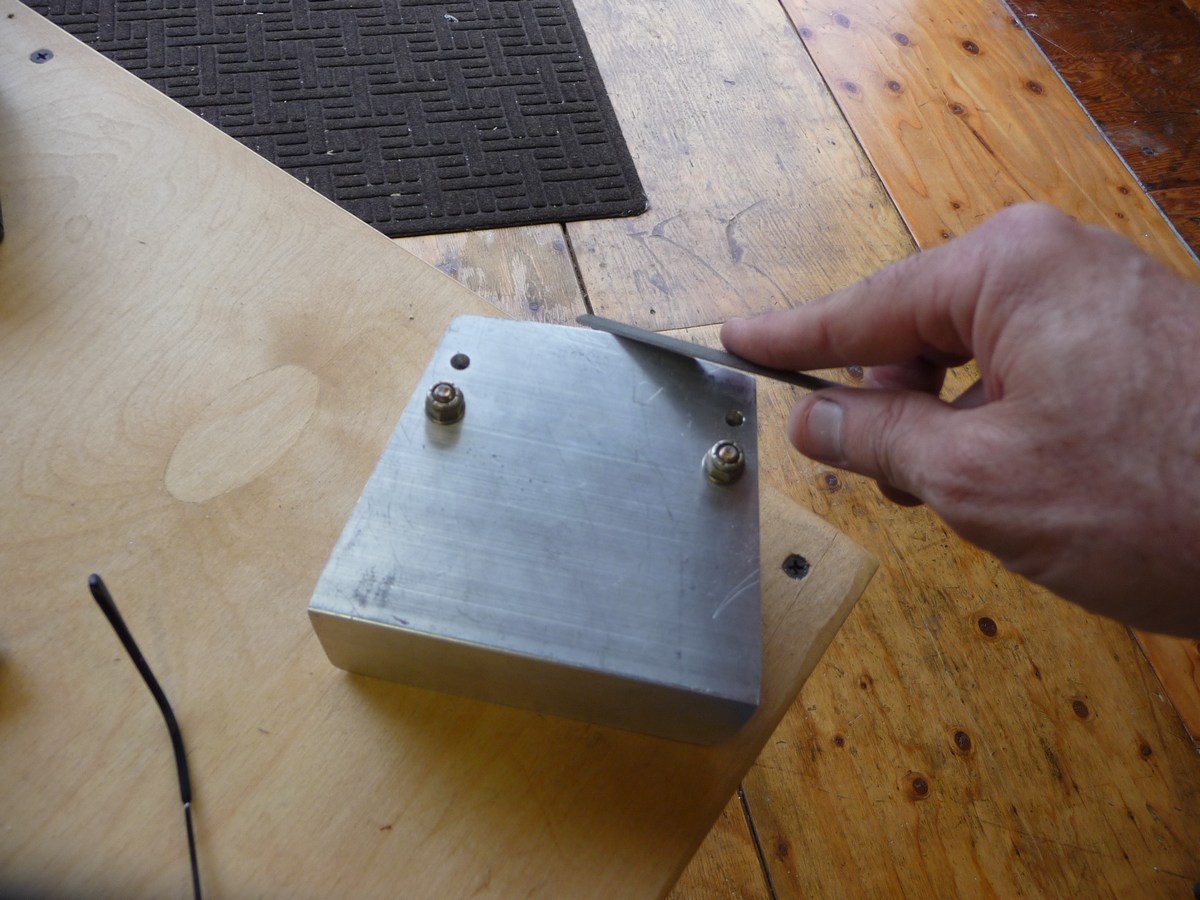

Then it was time to sit and make airplane noises and debate where I wanted it. I'll drop it off next week to have a nylon pad machined to fit between the angle and the center tube.

I'm also thinking about using the standard rudder tubes instead of the pads. My sneakers just seemed to ride better on them.

That will pretty much be it for this year. Might be some minor hull work but it's time to pay the piper for this year of fun.Of course, tonight as I was commuting to work I thought of a different way of doing it that should eliminate the AN3 nuts that stick out on the back. Now I have to knock out 2 trips before I can get home and see if my idea works.


Rivnuts: a concern
Before any other SeaRey builders decide to emulate me and install their seatpans with Rivnut, I want to advise you that a debate about their strength in this application is taking place on the private SeaRey builder's forum. If you are considering this idea please refrain from doing so, and get on the forum to read the thread.
Steve
Steve
Friday, September 23, 2011
Rivnuts
NOTE: The Rivnuts have been removed from the aircraft. DO NOT make this modification!!
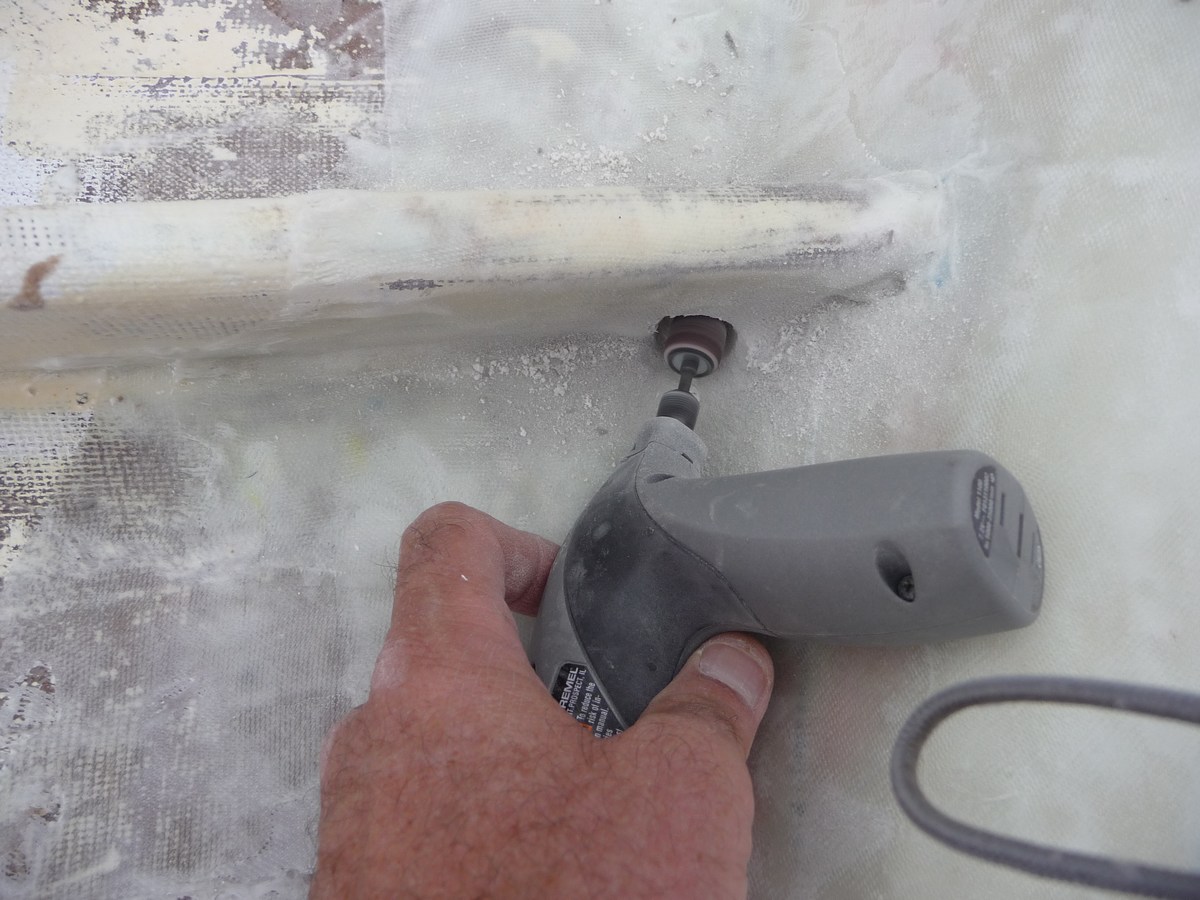
The seat pans are supposed to be riveted in place, which blocks off an area of the cockpit floor. I wanted to be able to access this area to store a backup battery, or for whatever reason. Rivnuts are simply a rivet with a threaded insert and I decided to give them a try.
A little paranoia goes a long way to making sure you don't drill in the wrong place. I used #8 screw sized rivnuts.

I used the "keyed" version, which requires a small notch to be filed in each hole.

I also added a bit of Permatex sleeve retainer to lock the rivnut in place.


By the time I got to the seatbacks I tried something different. First I drilled and clecoed it with a 1/8" bit, then removed the seatback and enlarged the hole in the tube for the rivnut. This worked fine for one of the seatbacks...


But the left seatback did not fit correctly. In a fit of common sense I put the frame in place, then drilled the pilot holes and installed the rivuts. It takes overnight for the Permatex to dry, tomorrow I'll enlarge the holes in the seatback to fit. I should have done this to start with instead of trying to do the full size hole in one shot.

By the way, here's the winch...

And the SeaRey gets airborne for the first time.

Tonight I started machining the new throttle bracket, using 1/4" x 4" 6061. I was going to try to eliminate the backplate but realized it was beyond my abilities. Instead I'll just use some AN3 bolts through the existing holes.


Thursday, September 22, 2011
Imitation: the sincerest form of flattery
"One of the worst kept secrets in tap dancing is that we steal each other's steps. And that's what we do we just... rip off each other's steps. Anytime you see someone make a really great step you take it and shape it and try to make it a little different." -Gregory Hines, Great Performances: Tap in America
But first, take 5:28 and watch this clip, and consider that 5 of these 6 gentlemen have Gone West.
I sure don't want anyone to get the idea that I'm building this on my own. Most of the aftermarket mods to the SeaRey are not my ideas. I've been fortunate to meet and read about and be influenced by some incredible builders. I'd like to name them but know that somehow I will leave a name off the list, or miscredit an idea and disrespect them, which is the last thing I would want to do. So please remember that as you read this build, few of them are my own.
Here's one idea I stole and worked on this week: bumpers/standoffs for the back of the seats. I took some leftover 1" nylon rod and cut an angle on them, countersunk them for #8 x 1" screws and located them on the bulkhead. I then covered them with some felt made to cushion/protect hardware floors from furniture legs


The resin was also dry on the bilge pump mounts and I sanded them down, painted them and mounted the bilge pump.


I fitted some carpet to the side of the hull and found you could see the difference between the unpainted and painted parts of the hull through it. Leftover paint for one coat took care of that.


More fun: Scott loaned us his scissors-lift, and Einar helped install an electric winch in the rafters overhead.


Saturday, September 17, 2011
Laying it up
Sunday morning... I love the morning light, even if I hate mornings.

Every thing's laid out and ready for a long day.


A VERY important step: protect the hull with sheets of plastic.

IAW the book "Advanced composite techniques" a slurry of 1:1 epoxy-micro balloons is mixed

And applied to the hull and the foam, then the foam is pressed into place. In retrospect, I made the horizontal pieces too long and should have tapered them into the hull more.I also wish I had known about vacuum bagging back then.

As planned some slurry expanded into the holes I poked. The brown is West Systems 405 fillet blend. It worked ok but after the first pass I stayed with plain microballoons.

Fillet strips are applied to the sides and center.


The main pieces are prepped by applying a layer of slurry, then sandwiching it inside 2 sheets of 3 mil plastic sheeting.

After which the excess slurry is pressed out.


****note******
Adding the reinforcing rails was another one of those times where I should not have believed everything I read on the web. DO NOT add them, they're in the way of the hull/frame mate and also totally unnecessary. I've left this entry in the blog for history, and to warn others not to repeat my mistakes.
The next day I tackled the screwup with the reinforcing rails.


And with a bunch of scrap foam I filled in the gap.


"You ok in there Steve? Just checking."


Using scrap cloth I laid up all 4 at once, but tried something different. This time after applying/squeezing out the slurry I cut them into pieces and stripped off one layer. Then I used the other side as an applique. Thanks again to "Advanced composite techniques" for the idea.


The next morning I drilled and dremeled out the bilge drain holes.


Since I had the resin out I also drilled and filled the mounts for the rudder pedal springs.


More prep: the part of the cockpit that won't get carpet gets painted with Brightsides Hatteras off-white.

And prepping a place for the bilge pump mount plate to screw into.I'll smooth it out tomorrow.


Every thing's laid out and ready for a long day.


A VERY important step: protect the hull with sheets of plastic.

IAW the book "Advanced composite techniques" a slurry of 1:1 epoxy-micro balloons is mixed

And applied to the hull and the foam, then the foam is pressed into place. In retrospect, I made the horizontal pieces too long and should have tapered them into the hull more.I also wish I had known about vacuum bagging back then.

As planned some slurry expanded into the holes I poked. The brown is West Systems 405 fillet blend. It worked ok but after the first pass I stayed with plain microballoons.

Fillet strips are applied to the sides and center.


The main pieces are prepped by applying a layer of slurry, then sandwiching it inside 2 sheets of 3 mil plastic sheeting.

After which the excess slurry is pressed out.


****note******
Adding the reinforcing rails was another one of those times where I should not have believed everything I read on the web. DO NOT add them, they're in the way of the hull/frame mate and also totally unnecessary. I've left this entry in the blog for history, and to warn others not to repeat my mistakes.
The next day I tackled the screwup with the reinforcing rails.


When I started on the bottom the extent of the poor glasswork became obvious. I decided to just take all the edge glass off.


And with a bunch of scrap foam I filled in the gap.


"You ok in there Steve? Just checking."


Using scrap cloth I laid up all 4 at once, but tried something different. This time after applying/squeezing out the slurry I cut them into pieces and stripped off one layer. Then I used the other side as an applique. Thanks again to "Advanced composite techniques" for the idea.


The next morning I drilled and dremeled out the bilge drain holes.


Then applied a layer of resin to waterproof them.


Since I had the resin out I also drilled and filled the mounts for the rudder pedal springs.


I think summer is over...
More prep: the part of the cockpit that won't get carpet gets painted with Brightsides Hatteras off-white.

And prepping a place for the bilge pump mount plate to screw into.I'll smooth it out tomorrow.

