Home for a quick 24 hours, too rainy to cut the grass so it gives me a good excuse to work in the hangar. The project I've got contracted out isn't ready yet, so I worked on other stuff.
The heater came, courtesy of Jim Ratte. Instead of fitting in the nose by your feet it fits on the boom tube in the baggage compartment. The advantages are weight reduction because you're not carrying the weight of the fluid all the way to the nose and back, and this location eliminates the possibility of a coolant leak in the cockpit. I'm told your feet stay relatively warm in the SeaRey since there is no air movement in the nose and you get waste heat from the avionics. Whereas your shoulders are in the draft from the canopies, and from the aileron tube exiting the cockpit overhead, so having the heater directly behind your shoulders makes sense. The disadvantages are you have to load the baggage compartment carefully around the heater, I'll make it work. More on the install later when the time comes.

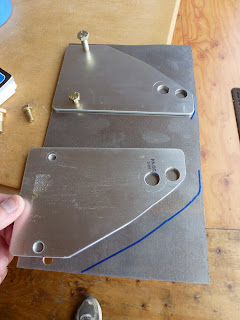
Russ Garner came up with a modification of the rear gear actuator mounts. In the stock design they are 2 separate pieces, the force from the gear causes the actuators to attempt to rotate around an AN4 bolt in the center, and an AN5 bolt helps to counter this force.

Russ's mod makes these 2 separate pieces one continuous one, made from .125 6061T6 sheet. Here's the assembly sequence, took about 3 hours over 2 days.

The sheet came in a 2'x2' square, it took some creative cutting to get the 10" piece out, so I ended up with a spare.


Using the original as a template for the first holes.

Put it in place....

Secure with clamps...

And drill the other side from the front.

Once drilled trim the excess off.

And drill the holes for the gear bushings. I was finally about to get rid of the old holes from the original gear setup, which had insufficient gear overcenter.


Not shown, but I installed the gear legs. Ops Check Good!!!

Again, a comparison to the original 2 piece setup.The front has to have a gap because the aileron control tube runs up the center.
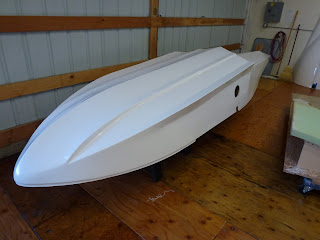
I ended the day (with timely assistance from Ralph) by flipping the hull over in preparation for KeelGuard installation. The stuff is HEAVY, but worth saving the wear and tear on the hull. Ya work to save ounces, and add pounds. Oh well......
Hi ho, hi ho, about an hour later it was back to work I go.
The heater came, courtesy of Jim Ratte. Instead of fitting in the nose by your feet it fits on the boom tube in the baggage compartment. The advantages are weight reduction because you're not carrying the weight of the fluid all the way to the nose and back, and this location eliminates the possibility of a coolant leak in the cockpit. I'm told your feet stay relatively warm in the SeaRey since there is no air movement in the nose and you get waste heat from the avionics. Whereas your shoulders are in the draft from the canopies, and from the aileron tube exiting the cockpit overhead, so having the heater directly behind your shoulders makes sense. The disadvantages are you have to load the baggage compartment carefully around the heater, I'll make it work. More on the install later when the time comes.

Russ Garner came up with a modification of the rear gear actuator mounts. In the stock design they are 2 separate pieces, the force from the gear causes the actuators to attempt to rotate around an AN4 bolt in the center, and an AN5 bolt helps to counter this force.

Russ's mod makes these 2 separate pieces one continuous one, made from .125 6061T6 sheet. Here's the assembly sequence, took about 3 hours over 2 days.

The sheet came in a 2'x2' square, it took some creative cutting to get the 10" piece out, so I ended up with a spare.


Using the original as a template for the first holes.

Put it in place....

Secure with clamps...

And drill the other side from the front.

Once drilled trim the excess off.


And drill the holes for the gear bushings. I was finally about to get rid of the old holes from the original gear setup, which had insufficient gear overcenter.


Not shown, but I installed the gear legs. Ops Check Good!!!

Again, a comparison to the original 2 piece setup.The front has to have a gap because the aileron control tube runs up the center.
I ended the day (with timely assistance from Ralph) by flipping the hull over in preparation for KeelGuard installation. The stuff is HEAVY, but worth saving the wear and tear on the hull. Ya work to save ounces, and add pounds. Oh well......

Hi ho, hi ho, about an hour later it was back to work I go.


