A
guide to attaching the fabric to a SeaRey's wing via stitching
instead of rivets.
First,
there is no sane reason for stitching the fabric to a SeaRey's wing
in place of rivets. The factory approved method works fine, is
proven, in it the covering is riveted directly to the rib at regular
intervals, and the marking, drilling and riveting takes about an
hour/wing. Stitching, on the other hand, takes at least 4 hours/wing,
but in my opinion it gives a cleaner finish, and takes you back to the days of
wooden airplanes, linen fabric, and doped wings. Stitching
requires planning, and note that this is not a “How to” but
instead a “Guide” with some important parts (such as how to tie
the knots) left out. If in doubt you should always defer to AC
43.13-1B, an IA, and good old common sense.
In
the simplest form, stitching is taking waxed thread from the top of
the wing out the bottom, around the rib and back out to the top on
the other side, forming a loop which is tied off before advancing
inside the wing to the next hole. Ideally, there would be no
interfering structure within the wing, and you would be able to spend
a day passing your needle back and forth from top-bottom and back,
methodically tying knots.
HOWEVER, each SeaRey wing has a reinforcing truss that is far wider than the rib, and the thread will rub against them. In addition, the thread must also be protected from the drag and anti-drag cables, stainless tie wraps, and the aileron torque tube.
HOWEVER, each SeaRey wing has a reinforcing truss that is far wider than the rib, and the thread will rub against them. In addition, the thread must also be protected from the drag and anti-drag cables, stainless tie wraps, and the aileron torque tube.
.JPG)
First, Jim and I reviewed the chapter about rib stitching on PolyFiber's dvd. Quite honestly, I didn't plan this as well as I should have, and in retrospect I could have done it differently, but I'm not sure I would have since it all worked out fine, and safely.
.JPG)
You start by determining the spacing of the stitches. A chart included in the PolyFiber manual (and in AC43.13-1B) divides the spacing into areas in and out of the propwash, and by the Vne of the aircraft. The SeaRey's configuration makes it easy since the entire wing is ahead of the prop, and our Vne of 125mph falls well within the spacing requirement of 3.5” in-between stitches.
Spacing
is started front-back from the aft end of the leading edge sheeting
on the top of the wing, and the first stitch on each rib can be no
further than 1/2 of the normal stitch distance. This sets the first
set of stitches 1.75” aft of the trailing edge of the leading edge
sheeting, and was the first set of holes marked.
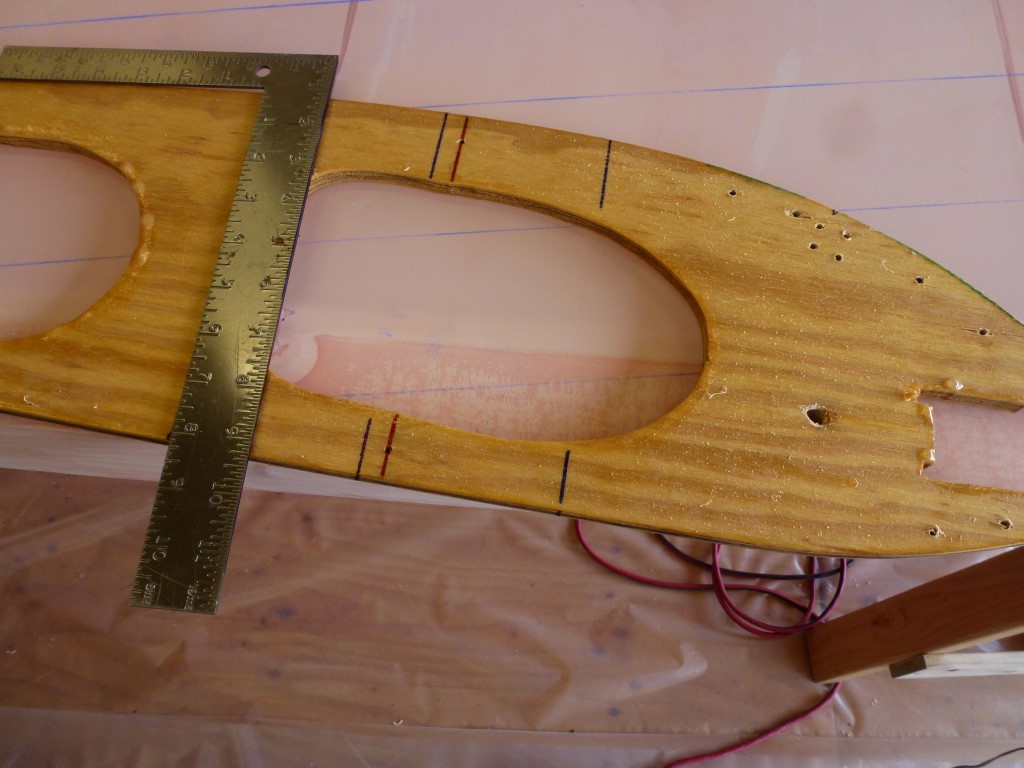
From
these marks, I proceeded rearwards marking the #1, #5, and #9 ribs at the
normal 3.5” intervals. Next I pulled a chalk line between the #1 and #9
ribs, checking for mid-point alignment at the #5. As we proceeded
toward the trailing edge we began
running out of rib on the outermost panels, and had to move the
chalk line inward as we continued.
After
you have completed pulling chalk lines, go back over the trailing
edge and check if any of the marks are further than 2.5” from the
front of the trailing edge sheeting. AC43.13-1B dictates that no
stitch be further than 2.5” from the front of the trailing edge
sheeting, so if any are you must measure the distance, and mark for
more stitching within this area. For simplicity when I was in this
situation I just split the difference and marked the appropriate
spot.

Next, the marks on the top of the wing were transferred to a scrap rib (see the July 3 entry, Solo).

Remember
during wing construction how you made a mark 11” aft of the leading
edge to set the spacing for the rib inserts? Using this line as a
vertical reference, I drew a line from the marks on the top to the
bottom of the template.
Now take the template, flip the wing over, transfer the marks to the bottom of the #1 rib, and stop for a second.Note the large gap between the trailing edge of the leading edge sheeting, and the first mark brought down from the top. This is because the top of the sheeting extends further aft than the bottom. I measured 3.5" forward of this mark, which gave me another mark within the1.75" limit for the first stitch to be aft of the trailing edge of the leading edge sheeting.


.JPG)
3/8”
tape is supplied in the kit and used for the rivets, I found that it
was too wide for stitching and used 1/4”. Apply the tape and lay a
coat of PolyBrush over it.

Now
you need to make holes for your needle on each side of the
reinforcing tape. The videos mostly show the holes being poked in the
fabric with a stitching needle. However, I found this led to fraying so
after the first rib I used a cheap pencil soldering iron to cauterize
the holes on the rest of the wings.

Then I started stitching, while Jim cast a wary eye to keep me from messing up. Stitching can be started from the front or the back, I chose to start from the rear because it was thin, there were no internal obstacles to avoid, and I didn't have to deal with the leading edge overhang.

I found it easier to set my laptop on top of the wing, and play the section about tying a Modified Seine Knot step-by-step (over and over and over...) Note the 18" needle. A 14" would have worked just as well.

I stitched the #1 rib until I encountered the first truss, and stopped for the day to think about it overnight.

The next morning I asked a local IA, Scott, to stop by, take a look and give me any feedback. Scott is an A&P, IA, ASES/AMES/ASEL/AMEL, and corporate Gulfstream pilotand has taken a keen interest in OspRey's progress. He was getting ready for an international trip the next day but he and his avionics tech Mike kindly took time from their busy workloads for a few minutes. I had AC 43.13-1B and the PolyFiber manual out for reference, and the PA wing build section open on the computer for comparison.
.JPG)
We talked about the How and Why of what I was doing, then in classic Check Airman mode he asked me to demonstrate what I was doing. I needed to reference the video again, but managed to tie a Modified Seine Knot to his satisfaction, and he gave me an Ok to proceed.

I mentioned I didn't plan this as well as I should have, and in retrospect I could have done it differently. I had stopped when I encountered the first truss, and that was when I realized I was up against a serious obstacle. If I had thought this out I would have realized about the internal obstacles, applied anti-chafe tape to the trusses, and planned my stitching around the various internal structures.
However, since I did not I had to figure out a way to stitch around them. I decided that instead of doing the traditional way of looping from the top-bottom-top of the wing, I would simply stitch the covering directly to each rib for the entire portion of the rib where there were internal structures. "Philosophically" (internal joke), this is the same as riveting the covering to the rib and was one of the things I had brought up in the meeting with Scott, and he had signed off on. It meant I would be tying twice as many knots, since I would have to tie the fabric to the top and bottom ribs separately, but it was the only way. And I would get a LOT of practice tying knots.
That was the theory. Putting it into practice took a lot of trial and error, and thought. A visit to the local fabric store revealed there were no needles with a tight enough curve, and barbless fish hooks didn't work either. I was almost ready to give up and go back to riveting when I suddenly realized I didn't need to pull the needle through, only the thread. I was able to form a piece of .032 safety wire into a "threadhook", and after some practice got into a tedious routine of taking the thread off the needle, threading it into the hook, pulling it through, and rethreading it onto the needle to tie the knot and move up to the next hole. Tedious but successful, and the last obstacle to stitching my wing fell.


You need to be careful about how much thread you use at a time, and keep track of it. I learned this the hard way, luckily without too much damage. While moving on with my stitching I stepped on a piece of thread that was laying on the floor, making a small tear in the wing. After talking it over we decided I could abandon the torn hole, move up 1/2" and continue.
.JPG)
Note the skipped holes on the chalk line. This is where a truss was riveted to the rib, so I couldn't make a stitch here. Instead the plan was to straddle the location, and put stitches on either side, which is acceptable according to AC43.13-1B as long as the holes are within the required spacing. This was done anytime this occurred.
.JPG)
We wanted to keep going on the covering, so after Giuliana brought us dinner she took Jim home, and I kept going. This is another one of those times my nocturnal nature came in handy. I was able to finish stitching the left wing, and the next morning we were able to continue with rib tapes, etc.
.JPG)
The next morning I went through and pushed down any knots that hadn't pulled into the wing during stitching.

This is what the stitching looks like when complete.
.JPG)
And after the rib tape is applied. I used flat thread, it will be interesting to see what it looks like after painting.
.JPG)