Thursday, October 24, 2013

RTFM

I ran out of landing currency at work and the sims are all booked up, so I've got some time off this week. I've been pushing hard the last several months and my body has held up really well, but once I told my body it could relax it immediately went "Whew, ok thanks!" and got sick. Nothing serious, just a mild cold that has left me fuzzy headed and not really up for critical work.


Einar's shop faces south, so if you're going to be sick you might as well go sit in the sunshine and look/work on airplanes.


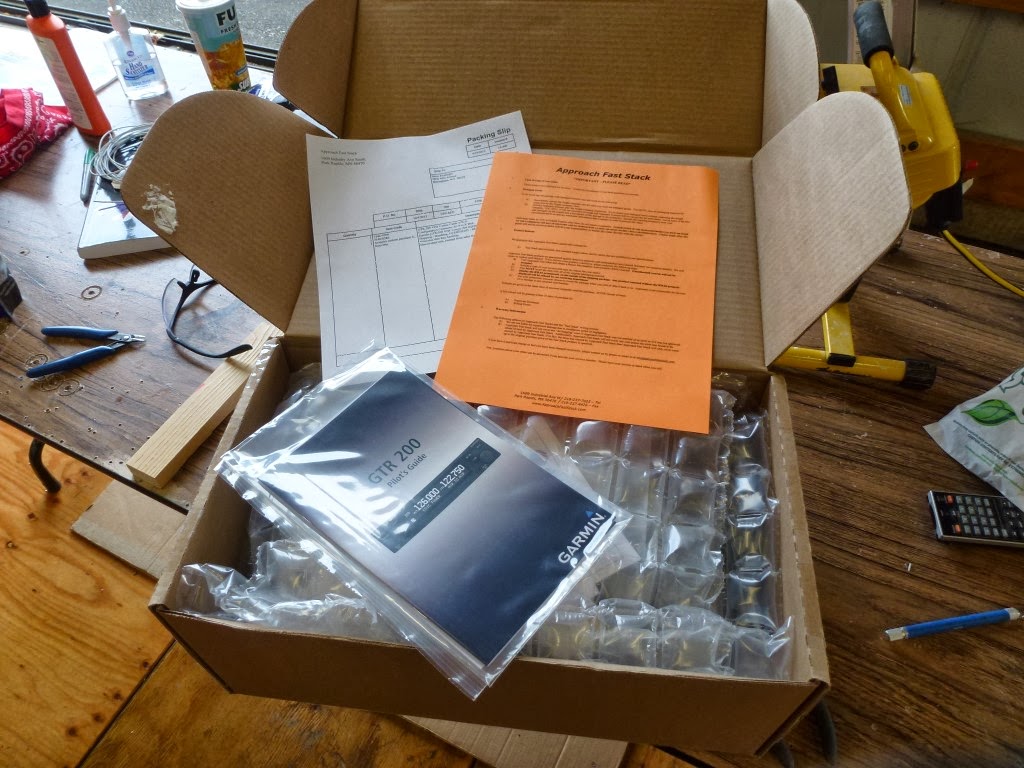
When I installed the GTR200, I only had time to hook up the cables to see if everything worked ok, but I didn't have time to lace up and properly wire them in. Simple, repetitive work to knock out when sick, but when done gives a feeling like you've done something. 


Slowly, gradually the wires were tamed and laced into place. Still got some work to do, but after a while I needed to take a break and play with my new toy. 


Guess I'm sicker than I'll admit, I didn't feel comfortable climbing into the cockpit but instead just pulled up a chair and leaned over the sidewall to look in, and baked in the sun.


If you've never heard the term RTFM, it translates to "Read The F(unny) Manual". Hooking up the wiring is simple, but integrating the Dynon and the Garmin took some headscratching, reading, and patient tech support from Tim at Approach Fast Stack Avionics. Can't say enough about their product, and their service.


"Back in my day, we had paper manuals, and we had to look things up by hand, none of this CTL-F fast lookup stuff in Adode format. And we had to tune our own radios by hand, dang nab it!!!" (I do miss paper manuals you could highlight with a yellow marker, underline and scribble notes in the margin and turn pages down to mark important stuff. Also, it's kind of fun to go back years later and reread them, think "Man, I remember when that was HARD!")


But seriously, a long time ago I used to be a Line Check Airman at Continental Express on the EMB-135/145, the best job I've ever had in aviation since it combined teaching and flying. I'd tell the new guys coming on board that it would take them about 300 hours to get comfortable with the glass cockpit, about 600 hours to really understand it, and at about 1,000 hours they'd get complacent and the avionics/airplane would bite them, hard. Some of these kids were coming on board with 500 hours total time, and were trying to learn an advanced glass cockpit airliner AND fly out of Newark/NY TRACON. The learning curve for them was steep, and as an IP some days were "sporty". We all survived, somehow, and one of the best feelings in the world is when I run into old friends who are no longer the FNGs but are now seasoned, accomplished aviators with their own experiences I can learn from. 

I'm not going to be paid to fly Osp 4-6 legs 16 hours/day for months at a time to learn her systems, so instead I'll be spending a lot of soft time this winter sitting in her, playing with buttons and going "What does THIS do?" until it's second nature.


Tuesday, October 8, 2013

Her first cross country (drive)

Never thought we'd be this far this year. Time to clear out of the hangar and move up to Einar's for painting.


If you pack carefully, it's amazing how much you can fit in a Subaru Imprenza. 


Einar showed me how to drive the first rivet in OspRey, he always seems to be there when I need him. 


Einar had a great trailer but it doesn't have ramps, so Osp was carefully lifted.


It's not uncommon for me to be at the airport in the evenings working, and there's rarely anyone else at the playing with airplanes after quittin' time. So what are the odds that the one night we need extra hands, my neighbor and CFI Scott would be debriefing a new student at 8pm at night? They graciously lended a needed hand to get her on the trailer.


Dude, where's my plane? 


She's spending the winter at Einar's, trading stories with Stinson, Jenny and Mercedes.


(Think I wasn't holding my breath?)


Saturday, October 5, 2013

GiTR done -200

Like a good wine or coffee, I need to let things percolate and sift when I'm learning something new. Arriving at the airport I had to open the box, just to check for shipping damage, you understand. 


I love the Approach cables, they're done so beautifully and come all rigged, labeled, and tested. 


Size comparison: GTR on the left, PAR on the right. But remember the PAR also has a remote radio box that needs to be fit in somewhere. In fact, PAR calls this unit the audio panel.


The Garmin is deeper,  I'll just have to make new rear supports. Weights are similar so no worries about strength.


The side holes match, that's a big relief since the front supports are harder to replace than the front ones. 


The front hole is just a little bit bigger. I had read that on the datasheets but there's nothing like seeing it for real. Bigger holes are easy to make, if it had been smaller....


Wiring looks simpler, 6 to hook up and the headset jacks.


First thing is to remove the PAR harness, and I think I'll just stitch everything back up before installing the GTR harness. Easier to keep separate in case I need to pull it later for repairs.


Good thing I worked on the avionics today, tire spiders are evolving into avionics spiders.


Redoing the radio started with careful examination and refreshing of my memory. "What does this wire do again?" I was paranoid about slipping and landing on the hull, breaking it.


One concern we've had is the closeness of the wire run between the hull and the transponder.


One of the few bad things about the GTR200 radio is that is only has 2 aux/unswitched audio inputs,  and I need 3 (Electrical Warnings, Gear Alert, and Trunk Monkey.) Steve at Garmin suggested the AP60 audio mixer, and when I started fitting it in I realized it gave me an opportunity to shift the transponder over and allow more room for the wire bundle.


The lateral mount of the transponder was required for antenna mount clearance, but it wasn't perfect. JR suggested I add a 90 fitting to the cable. Excellent idea, gave me even more room and solved the problem. Jim's avionics tray gives a LOT of flexibility to the radio installation.  


While I was working I heard a honkhonkhonk and ran outside in time to see the migration starting. It's been a good year, and it's not over yet.....


Careful now. Snip, snip, snip goes the scissors as the nylon lacing gets taken apart. Between worrying about cutting/nicking a wire and/or putting too much weight on the hull, I was concentrating pretty hard.


The harness had been planned so the electrical was in one bundle, and the avionics in another. As I took the PAR harness out I'd replace the lacing with tie wraps to hold it all together.


Garmin harness on the left, PAR on the right. The PAR has already been sold to another local pilot. 


I had done some lacing earlier this year, but Jim had done most of it. I got better as I went, might go back and redo some of the early parts later. 


Time for the GTR. Scott wisely suggested I go in from the back, good idea. It didn't take long to have the front fit into place.


And he also made a good suggestion about the back mounts that enabled me to leave the old one in place and just add to it.


Gotta love good people that are generous with their time and advice. I was having problems with recrimping some old wires, easy if you've done it many times before and are willing to show a rookie how it's done. 


 Incremental testing. It's all done and wired up, first test the old stuff without the new radio.


Ops check good. 


Showtime. Hook it up, check, double check, and


Throw the switch. Eenine, meeny, miney, moe, check out my new radio.


Better vs Best

During the Space Race in the 1960s, NASA found itself in a conundrum: technology was changing so fast that by the time a spacecraft was ready to fly, some of it's systems such as computers, etc, were obsolete and could be replaced by lighter equipment that could do the same job faster. Unfortunately, replacing a system often had effects on other systems, which required changes, which led to cost overruns and delays, and by the time the spacecraft was ready to fly something else would have changed and there'd be something else New and Improved out, which led to..... Over time, this became known as the "Better vs best" syndrome, as when an engineer would say "I can make it better!" and someone else would counter with "But it's already the best we need."


I always swore that when I owned an airplane of my own, I'd have an excellent radio. No crappy scratchy tin cans on a string radio for me, I've been spoiled by the digital radios in the airliners I fly. The best radios were built by Garmin, and Garmin might just was well be spelled Goldmin for their prices. Some limits were even beyond my capabilities.

When I designed my panel last year the PAR100EX was the current hot radio within my pricepoint,  and even though it was more than I needed (designed for a dual nav/com setup, with a built-in 4 place intercom) I went with it and we wired it into OspRey. I still remember the night earlier this year when Jim and I stayed late and were able to throw the switch for the first time, see all the pretty lights and talk to each other. We were very happy.


Damn you, Garmin.


Now that I've got my avionics all wired in and happy, what does Garmin do this year at Oshkosh but release a single comm/2 place ICS radio with twice the power at half the price of my PAR100EX. Stop me if you've heard this before, but the GTR 200 got rave reviews, and it was designed to interface with the Dynon Skyview. I took a hard look, and when I mentioned my dilemma around the airport I quickly found a buyer for the PAR. It only meant undoing the wiring harness, getting access to hard to reach areas while leaning over the fragile hull, and redoing something Jim busted his arse off building.

I thought long and hard, went back and forth a few times, and finally made the decision to make the change. Jim ordered the radio and new wiring harness through Approach Fast Stack, a local avionics tech I know has agreed to keep an eye on me, and a few minutes ago the box with the new toys arrived. I'm off the rest of the week, and it's probably one of the most stupid things I'll do, but I'm off to undo a bunch of hard work, and work even harder making the change. Stay tuned.


Friday, October 4, 2013

I am Pylon Man....

More metal work, more parts of the airframe disappearing from sight. First, assemble the flap actuator mechanism.


The aft ends of the pylon covers should get a slight crimp to fair into the aft root tube better, but not all of us have a 30" brake. A quick visit to Carlson Steel and the guys used their huge press to make a 20 deg bend in the last 1/2" of the 0.016" cover.


Before starting to fit the cover, a little trimming of some brackets, purely for aesthetic reasons.


The top is already notched for the root tube


but not very well. Even in a fixed area it needed trimming. I wonder what and when things changed?


It's non-structural soft aluminum, the side covers are just to hide the pylon interior and they take very little impact loads so they're only 0.016" thick. After experimenting with different tools, I found the aluminum could be easily cut with a cheap pair of scissors. 


Each turtledeck fits slightly differently, depending on the builder, so the pylon is given a generous amount of overlap on the bottom to allow trimming and fitting. Other builders have had luck with making up paper and cardboard templates, but the paper was too flimsy to get a good measurement on,


while the cardboard was too coarse. Jim told me the tolerances were 1/32" of an inch, and while I knew he was joking I wanted to make it look good. 


I decided to just fit the cover as I went. This meant risking scratching the fiberglass on the turtledeck, so I'd have to be careful.


Little by little, snip, snip, snip.


The scratches buffed out.


At the aft end it became obvious it was time for a big cut. Deep breath.


The big cut was exactly right, now it was time to smooth everything out into a smooth curve.


Hmmm... I wonder how symmetrical the sides are? They are? Excellent.


Cuts the work in half, just lay the right on top of the left and trim slightly oversize, just in case.


Better too big than too small.


Now mark the tubes on the inside of the covers


And drill for the rivets. The manual calls for rivets on the diagonal, others debate the necessity. They're mostly there to keep the cover from oil canning in the slipstream and making noise. Of course, with the engine just a couple feet further aft, will you notice?


Now a cool technique. Put a marker in the flap horn and run the motor.


drawing an arc over the flap travel.


Drill a hole for the pivot bolt


And a series of 3/4"-1" holes along the arc.


Sketch a tangential line from hole-hole.


and use snippers to cut out the excess. Then file smooth.


I used a 1" hole saw because I wasn't that confident in my metal skills. In retrospect I wish I had used the 3/4" for a nicer fit, but it's ok.


Next, holes for the radiator lines to the heater were cut. Nothing fancy here, just 2 big holes cut next to each other and trimmed to match. 


During final assembly more fairings will be attached at the wing root-pylon junction, and angles get attached at the top of the pylon cover. The front of the angle gets trimmed so it can be anchored behind the root tube front mount.


Part of the angle shows through the flap arc, the belt sander quickly fixed that.


Summer is definitely over, it's sweatshirt time in the hangar, already dropping down into the 40s at night.


The front of my covers had about a 1/2" lip that needed to be trimmed back to be flush with the front root tube.


I love it when a pylon comes together. (sorry, couldn't resist.) Sticky notes denote what rivets go where since you use stainless steel on the metal-metal, and aluminum on the metal-fiberglass along the base.


The second rivet didn't fit, so I grabbed the drill and started cleaning out the hole. Met a lot of resistance and the hair on the back of my neck stood up on end screaming that Something Was NOT Right and STOP NOW!!


Glad I did. I was about to drill through my wire bundle.


Fortunately, all I did was barely dimple a cable.


This is why I'm a bit of a hoarder. A piece of scrap moved the wires out of harms way.


Chunk, chunk, chunk...


A little bit of cutting fluid


And the top is anchored.


I've seen a lot of variance in the aileron tube cover, some like it faired into the pylon covers,


while some like them as outies. This is convention for aircraft, since this way airflow cannot get under the front of the fairing and lift it. However, because it's such a small area and in a bubble of low pressure, you can get away with tucking it into the pylon covers and going against convention.