Continuing with the learning, we'd like to do everything right the first time, but sometimes we learn more from fixing our mistakes. Here I've put the reinforcing gusset over the aileron horn reinforcing panel crooked. Yeah, it's only about 5 degrees off, and it will be on the bottom of the wing so it won't be easily seen, but...
A quick call to PolyFiber, and Greg told me to use reducer on the gusset to remove it, clean off all the old PolyBrush, and redo.
.JPG)
.JPG)
.JPG)
Now I know how to fix mistakes.
.JPG)
After that it was time to continue with the pinking tapes for the wing.
.JPG)
Snap a chalk line for the leading edge pinking tape, and attach.
.JPG)
.JPG)
The PolyFiber video emphasizes that "If you can feel it, you'll see it." and that paint will only magnify mistakes, not hide them. Just like painting a house is all about the preparation, now I know why Jim was on my case to be neat when I was laying down the Poly. I'm going to be spending some time with reducer and an iron working out any imperfections, good workout for my OCD.
.JPG)
Until now I've been following in Jim's tracks, but it's time for me to go it on my own with the flaps and ailerons. I started with the ailerons since they're small pieces, easier to work with, and less fabric wasted if I mess up.
.JPG)
A good cleaning with MEK first.
.JPG)
Really nasty stuff, that MEK. I go through a couple dozen gloves a day, easy.

The ailerons are taped together, and the endcaps riveted on.
.JPG)
Little bit of a fit problem was taken care of with a belt sander.
.JPG)
.JPG)
At first I used the anti-chafe tape on every rib, and over every rivet
.JPG)
but I decided the tape might interfere with the covering, so except where it went over the rivet on the leading edge and over the trailing edge junction I cut it off. (Later I found out it was a good decision.) The wrapped and shrunk fabric is the only thing holding the aileron and flaps together, there is no mechanical attachment.
.JPG)
Measure out the fabric,
.JPG)
review the dvd
.JPG)
and take a trip down the road to the museum to check out the covering on a Stearman. Nice to understand what I'm looking at, and be able to start to see subtle things in their job.
.JPG)
A layer of PolyTak, let it dry, then attach the fabric with a thinned layer of PolyTak.
.JPG)
Wrap the fabric over
.JPG)
trim,
.JPG)
apply a layer of full strength PolyTak, and let dry.
.JPG)
Then a diluted coat of PolyTak thru the fabric.
.JPG)
The tips are next, and proved to be a real PITA.
.JPG)
These were shot later during the edge pinking taping, but it's representative of my first try at the tips. I folded the top down,

trimmed, Tak'd, and put in place,

then repeated for the other side.

While it was acceptable in terms of strength, it left a lot to be desired in terms of looks. We'll get back to the solution later.

Let dry, and shrink in two stages.

After the covering was shrunk it got the fine tooth treatment with an x-acto knife, trimming loose threads.
.JPG)
In some areas the covering had stuck too far into the aileron
.JPG)
a little MEK and a hit with the iron fixed that.
.JPG)
.JPG)
A first coat of thinned Brush to seal the fabric.
.JPG)
What does the X-15 and OspRey have in common? The first coat of covering is pink.

Of course, the X-15A-2 was pink because it was an experimental ablative coating to insulate it against the heat of a Mach 6 speed run. Don't think Osp will have that problem. I hope.
.JPG)
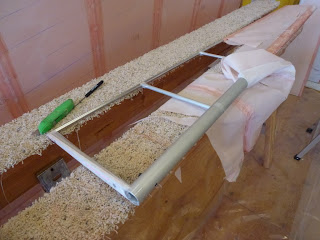
With some scrap wood and tubing, I made some jigs to hold the ailerons while I was working on them.
.JPG)
.JPG)
Later I modified it, making the space between the uprights narrower and allowing both flaps and ailerons to be put in place at the same time.

However, one thing to watch out for is where the fabric rests against the uprights.

Quick hit of the iron and it was good as new.

Next came the pinking tapes. Chalk lines on the long runs, sharpie on the short runs to mark the lines for the first coat of Brush. Neatness counts, I've learned.
.JPG)
.JPG)
Start at the back and work forward so everything overlaps,
.JPG)
and the pinking tapes for the tips.
.JPG)
.JPG)
.JPG)
.JPG)
This was my first try at the tips, and while it was strong enough, it didn't look good.
.JPG)
I decided to remove the pinking tape from the tips and redo them.

Applying the reducer resulted in the fabric separating from the tip, and it just got to be a mess,

so I took a knife to the covering and started over again.
This time things went faster, easier, and better.


Einar showed up, and together we made short work of the flaps.
.JPG)
.JPG)
.JPG)
.JPG)
.JPG)
.JPG)
.JPG)
.JPG)
.JPG)
.JPG)
.JPG)
A quick call to PolyFiber, and Greg told me to use reducer on the gusset to remove it, clean off all the old PolyBrush, and redo.
.JPG)
.JPG)
.JPG)
Now I know how to fix mistakes.
.JPG)
After that it was time to continue with the pinking tapes for the wing.
.JPG)
Snap a chalk line for the leading edge pinking tape, and attach.
.JPG)
.JPG)
The PolyFiber video emphasizes that "If you can feel it, you'll see it." and that paint will only magnify mistakes, not hide them. Just like painting a house is all about the preparation, now I know why Jim was on my case to be neat when I was laying down the Poly. I'm going to be spending some time with reducer and an iron working out any imperfections, good workout for my OCD.
.JPG)
Until now I've been following in Jim's tracks, but it's time for me to go it on my own with the flaps and ailerons. I started with the ailerons since they're small pieces, easier to work with, and less fabric wasted if I mess up.
.JPG)
A good cleaning with MEK first.
.JPG)
Really nasty stuff, that MEK. I go through a couple dozen gloves a day, easy.

The ailerons are taped together, and the endcaps riveted on.
.JPG)
Little bit of a fit problem was taken care of with a belt sander.
.JPG)
.JPG)
At first I used the anti-chafe tape on every rib, and over every rivet
.JPG)
.JPG)
Measure out the fabric,
.JPG)
review the dvd
.JPG)
and take a trip down the road to the museum to check out the covering on a Stearman. Nice to understand what I'm looking at, and be able to start to see subtle things in their job.
.JPG)
A layer of PolyTak, let it dry, then attach the fabric with a thinned layer of PolyTak.
.JPG)
Wrap the fabric over
.JPG)
trim,
.JPG)
apply a layer of full strength PolyTak, and let dry.
.JPG)
Then a diluted coat of PolyTak thru the fabric.
.JPG)
The tips are next, and proved to be a real PITA.
.JPG)
These were shot later during the edge pinking taping, but it's representative of my first try at the tips. I folded the top down,

trimmed, Tak'd, and put in place,

then repeated for the other side.

While it was acceptable in terms of strength, it left a lot to be desired in terms of looks. We'll get back to the solution later.

Let dry, and shrink in two stages.

After the covering was shrunk it got the fine tooth treatment with an x-acto knife, trimming loose threads.
.JPG)
In some areas the covering had stuck too far into the aileron
.JPG)
a little MEK and a hit with the iron fixed that.
.JPG)
.JPG)
A first coat of thinned Brush to seal the fabric.
.JPG)
What does the X-15 and OspRey have in common? The first coat of covering is pink.

Of course, the X-15A-2 was pink because it was an experimental ablative coating to insulate it against the heat of a Mach 6 speed run. Don't think Osp will have that problem. I hope.
.JPG)
With some scrap wood and tubing, I made some jigs to hold the ailerons while I was working on them.
.JPG)
.JPG)
Later I modified it, making the space between the uprights narrower and allowing both flaps and ailerons to be put in place at the same time.

However, one thing to watch out for is where the fabric rests against the uprights.

Quick hit of the iron and it was good as new.

Next came the pinking tapes. Chalk lines on the long runs, sharpie on the short runs to mark the lines for the first coat of Brush. Neatness counts, I've learned.
.JPG)
.JPG)
Start at the back and work forward so everything overlaps,
.JPG)
and the pinking tapes for the tips.
.JPG)
.JPG)
.JPG)
.JPG)
This was my first try at the tips, and while it was strong enough, it didn't look good.
.JPG)
I decided to remove the pinking tape from the tips and redo them.

Applying the reducer resulted in the fabric separating from the tip, and it just got to be a mess,

so I took a knife to the covering and started over again.

This time things went faster, easier, and better.


I made sure there was more than enough overlap this time, even tucking a bit of the bottom layer of covering into inside of the tip, and let it dry overnight before ironing.


Einar showed up, and together we made short work of the flaps.
.JPG)
.JPG)
.JPG)
.JPG)
.JPG)
.JPG)
.JPG)
.JPG)
.JPG)
.JPG)
.JPG)