Progressive Aerodyne, SeaRey, EAA, Experimental airplane, Seaplane, Build log,
Wednesday, July 18, 2012
A very good week
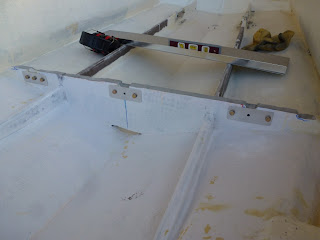
I could cover up the way the week started, but I won't. I tried to remount the fuselage using the original holes, but it didn't work, the holes didn't match and I finally sanded the replacement patches off and started over, filling in the holes with an epoxy/filler mixture.
I also elongated the channel bracket mounting hole slightly, so I could adjust them side-side as I was installing the frame.
Previously I installed the doublers, then lowered the frame into the hull. This caused problems since with them the frame was tightly fitted to the hull, and if I was off just a little I bent the doubler. I finally realized it was smarter to leave the doublers off, lower the frame into the hull, THEN insert the doublers.Worked like a charm, and I was able to even out the doublers, instead of having one thick one and one thin one.
I wasn't as lucky with the drilling this year as I was last year, I ruined a couple doublers when my drilling was not exactly perfect. It took all day of drilling, marking, redrilling, trimming, but I finally got the doublers exactly right. I filled the holes with thickened epoxy, put the frame together and inserted the bolts, let it set up then removed the bolts. Perfect, tight, fit.
I also tackled the front stringer/crossbeam issue. It was installed offset laterally to the left by 1/2",
and uneven longitudinally by 1/4".
Last year my solution to this was to cut into the stringer, weakening it. I talked to other builders and found this was not an uncommon problem with the hulls, and the solution was to notch the channel brackets so they could be adjusted fore/aft to fit with the rubber spacers (this is where I got the idea for notching the bulkhead channel brackets.). I hated to do it, but I found it easier to disassemble the front cockpit, removing the floor pan for easier access.
Like the bulkhead stringers, I filled in the holes, added doublers, redrilled the holes, trimmed the stringer to an even plane, and reglassed the stringer.
And I had to take a minute to assemble the hull, sit in it and remember what I'm working toward. I love the light in the morning during summer.
I've also been working on the design of the panel, using a program called XPanel. Here's the "D" version of the panel, still got some changes to go. Note the analog airspeed indicator and vertical compass in the top for easy reference, engine instruments will be displayed on the Dynon, lights across the bottom flowing in needed sequence from left-right, and accessories (heater, bilge pump) above them.
I didn't like the color I had been using for the interior, the tint was shaded toward yellow, so I shifted to a light tan. I'll be on the road for the next several days for work, when I get home I'm hoping to have something really cool to show you, if the contractor can pull it off.
Prepping for the mate, it was time for odds and ends like cutting a bilge drain hole. I found some gaps in the hull-foam seal so I filled it with a resin slurry. I'll mount the bracket when I flip the hull for some work on it I'll tell you about later.
I kept trimming the turtledeck fitting at the aft clusterbracket until it now fits..
A puzzle was getting the turtledeck far enough aft to cover the hole for the aft flying wires. I finally shifted the bulkhead angle aft, and it fit fine, so I'll have to adjust that bracket in the future, but at least I got that figured out.
Moving on, I mounted the fuel tank sump squeeze bulb.
And I'm still working on fixing the damaged hull section, now just fine-tuning the underlip portion.
Labels:
avionics,
fiberglass,
frame,
fuel system,
hull,
turtledeck


