A white feather can mean many things. The Four Feathers was a 1902 novel about a British military officer accused of cowardice, and has been made into several different films. On the other hand, the legendary USMC sniper Gunnery Sergeant Carlos Hathcock wore one in his hat, and was nicknamed "White Feather" by the People's Army of Vietnam.


The first coat was a fog coat to get used to the gun and paint coverage, no sense in ruining it right off the bat when I could wait for the last coat.


Next up: Moving the fuselage just to paint the fin.

....
Building OspRey
has always been a series of small problems, overcome one at a time and occasionally
requiring me to go back, undo, and redo something I had done days, weeks, months, and, due to the length of my build, sometimes years ago. One thing I
had not thought about being a problem was painting, in my naiveite I had
thought it was a simple matter of calling up a paint shop, they’d pick it up or
I’d wheel her across the airport, and a few days and a couple hundred dollars
later, *poof*, she’d emerge like a butterfly with a magnificent coating.
I can hear you
all laughing through your monitors.
One shop
had a months long waiting list, the cost was going to be almost half the price
of the kit, and I’d have to deliver her. That was the BEST option. Once I said
“toxic chemicals” painting in the garage was OUT, leaving other options such as
building a temporary paint booth at my house (We lived on a hillside at the
time, so that wasn’t going to work.), then a couple years later we moved to a
home on level ground (That’s good!) next to an elementary school (That’s Bad!),
and I could picture the conversation I’d be having with the local authorities if
I built an inflated paint booth next to the playground (“What’s that big tent
in your yard, why does it smell, and why is all the playground equipment now
pink?”) I finally was able to make arrangements with a local independent
pilot/mechanic to paint Osp for me, but a few days after I dropped off the tail
feathers I received a distressed phone call from him asking if I had read the
Polyfiber manual. When I said Yup, I was directed to page 23, where it said, in
bold letters


Shit. SHIT. And SHIIIIIIIIIT!!!!
Painting was put on hold for months
while I grappled with the problem. I could strip and recover, but that would
put me months behind, and at a cost. Jim reassured me it was going to be Ok,
that the Sharpie would not bleed through, but everything I read and everyone I
talked to said otherwise. After putting off the decision as long as I could, in
mid-summer I decided to just go ahead and paint, and if it bled through I’d
alter the color scheme (which I planned to do with vinyl) to cover the problem.
Only problem was that my friend was now
busy as heck, and the soonest he could get to painting wasn’t going to be for a
while. After thinking about it, I did some reading, took a deep breath, asked
if I could use the paint booth, and I’d do the painting myself. “Sure” came the
response, but I could not dillydally, I had to work around my friend’s business
and get going ASAP. I hastily rearranged my September schedule, ordered more
PolyBrush and reducer to replace stuff I had loaned out, and a few days later
another adventure began.
Like so many pilots, I‘ve been building
models since I was a kid, but since it was my first full sized paint job I knew
there was no way I was going to do a perfect, Lindy Award winning job on my
first try. If I was lucky it would be a “5 foot paint job”, or even a 10’er,
but I’d be happy with a 15-20’ paint job (not really). I was realistic- I could
take forever to make a perfect job, and the first scratch or cut of it would
negate all the effort and upset me. OR, I could do my best, practice on the
scrap pieces I had built, and accept the results. I’ve been building her for
many years, OspRey & I have a lot of sky to explore, a lot of adventure to
seek, and while I’m striving to do the best I can with every knot of wire
lacing thread and every rivet pulled, I’m not building her to be a hangar queen
that never flew or got sold off someday because I took so damn long building
her I lost my medical. Even Coco was encouraging me to get her done and get flying.

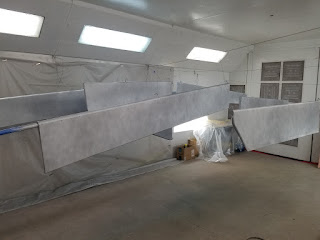
Yet, I didn’t want to do a sloppy job,
either. I decided to start with the 8
horizontal control surfaces (the fin and rudder will be painted at the same
time to insure the best color match possible), so if I DID screw up I’d only
have to repair a small part I could fit in the booth later with the wing or
fuselage/fin painting. Spraying the PolyBrush and PolySpray
was easy but stressful, who needs breathing equipment when I was already
holding my breath every time I went into the booth? We were having a heat wave
and though it was cool in the booth we decided to use some 8500 reducer I
happened to have accidentally ordered a few years ago. Trying to dance between
Dan’s work and my schedule, I was on a tight timeline and could not afford to
make a major mistake, so I could not afford a run that would take a week to dry
before I could even start sanding and redoing. I got the pink and silver on Ok, or at
least, pretty good enough for me, though I can easily see the imperfections,
and a trained eye would have a field day. But stepping back in-between coats, I
was still well within my 10’ paint job goal, so I pressed on.
During this I was researching paint. I’m
working with Scheme Designers to make the vinyl appliques for the stripes, etc,
so all I was going to be shooting was a basic white, and I wanted a simple,
durable paint that would look good, one that would cover both fabric and metal
so I would not have to learn 2 separate techniques or buy 2 separate sets of
chemicals, because you KNOW I’d run short at 430 pm on Friday with the weekend
off. And at an average of $300/gallon, I didn’t want to waste it.
I started leaning toward Polyfiber
Aerothane, not because I was enamored with the glossy wet look finish so many people seem to prize (I prefer a satin finish to my projects), but because, unlike PolyTone, it would go on fabric, fiberglass, and
metal, was designed to work with the PolyFiber covering as one complete system,
and Consolidated Aircraft, the owners of PolyFiber, have a tech support number
they encourage you to call. Hope I’m not abusing it, but I’ve ended up on a
first name basis with a very kind, patient gent there named Greg. I’d been told
horror stories about how unforgiving Aerothane was to use, would run ran like
crazy if you looked at it wrong, how difficult it was to repair, etc., but Greg
patiently talked to me, explained Yes, there were some tricks that weren’t in
the manual, Greg told me some techniques he uses (it’s really cool that every
one of the tech guys also build and paint airplanes) and I should not hesitate
to call if I had any questions or my hand held. I pulled the trigger, ordered a
bunch of Insignia White (the color the group has said is the closest match to
the gel coat of the hull), and other assorted implements of creation needed for
painting, and went on a trip while the
silver outgassed.

The Polyfiber
manual (V21) says the perfect temperature to paint is 77 deg, but Greg told me
a better temp was 68, which was what the shop was close to during this cool
summer in Puget Sound. It was 65F inside the building so we turned on the
radiant floor heat overnight, but the next morning I was dismayed to realize
the thermostat was outside the paint booth, the heaters were inside, and the
booth trapped heat, resulting in a booth temp of 72F. I didn’t want to open the
doors and get dirt in, so I turned down the heat, turned on the overhead fans,
and hoped the booth would cool down before I started painting. (I should not
have worried so much, it turned out to be a non-issue, the booth was well under
the 77F they recommend, it’s not like it was 98F in the booth.)
My schedule was
to paint the day after I had come home from a trip, but I was absolutely
wrecked with fatigue, and I called off painting the following day. Not wanting
to waste time, I went out to Dan’s place anyway, dressed up in the hood and did
a dress rehearsal of painting, getting fully suited up in and hooking up the air
lines, carrying the gun around and pretending to paint. I discovered a couple
gotchas about the layout of the booth and the way the hoses moved, so after
“painting” everything a couple times (ok, 3 times), I relaxed, and gave the
control surfaces a couple of fingernail passes to try to gently pry whatever
FOD I could off them. Wish I had been able to do a full sanding and repainting
of silver, but it would have set me back a week that I just don’t have, and I
was (sorta) happy with the small amount of FOD that was showing. I also
followed the manual and wiped down all the control surfaces with 2210 cleaner,
one nice tip I got from the CAC videos was to put it in a cheap spray bottle
and apply it to the controls surfaces that way, and it worked out pretty well,
except when the rag would occasionally catch on something to remind me of my
less than perfect covering/pink/silver work, sigh... But when I’d step back to
growl at myself at whatever the cloth had caught on I’d have a hard time seeing
where the problem was, so I’d feel better.


We had guesstimated
that painting all 8 horizontal control surfaces would take the entire gallon of
paint (it took 3/4), so it was easy to figure out the ratio of catalyst:paint, the “gallon”
of Aerothane is actually sent ¾ full, allowing the entire quart of catalyst to
simply be dumped into the can and mixed (for smaller amounts you measure and
mix it in a smaller cup). Greg said not to be gentle with mixing the two parts,
so on to the shaker the can went for 90 seconds, then it was 20 minutes of
nervous pacing.


Greg had told
me that while the manual recommended 3:1 paint:reducer, some of the shop guys
were going as high as 60% reducer, so don’t worry about adding too much. I
split the difference and made it a schmecken over 3:1, and the mixture seemed
to work out well. Of course, since adding 1 qt catalyst to ¾ gallon of paint
fills the gallon can, I had to use a plastic mixing bowl to separate them into
equal amounts, then pour them back-forth to mix them up. Unlike the Brush and
Spray, there is no difference in the reducer depending on ambient temperature.
As before, I
was absolutely terrified of spraying too heavy and causing a run, so I did a
little practice on the dummy pieces, and surprisingly, it took a lot of work to
put enough on to make the paint run, Greg had said the horror stories about runs were a bit of an exaggeration and just to be cautious, and follow the instructions. Reassuring, but I didn’t want to take that
for granted.


The first coat was a fog coat to get used to the gun and paint coverage, no sense in ruining it right off the bat when I could wait for the last coat.


The manual cautions over and over again about making one pass and
not going back to fix errors, so when I's see a piece of new FOD it took a lot of self control not to give it a quick squirt and to walk away.

It also cautions you not to recoat too soon, wait for the paint to become tacky, not dry, and that would be about 45 min at 77F, but I found my paint to be ready in about 30 minutes, so I applied a heavier second coat.

It also cautions you not to recoat too soon, wait for the paint to become tacky, not dry, and that would be about 45 min at 77F, but I found my paint to be ready in about 30 minutes, so I applied a heavier second coat.

I had called
Greg earlier with a tech question about painting the metal next week but he was
busy in the lab, he returned my call when I was in-between the second and third
coats. He asked how long it had been between coats, I said about 15 min, and he
told me to get back in the booth ASAP. Got there, checked my test pieces and on
the sides of the control surfaces and they were almost dry, so I started back
in. next time I’ll start in an inconspicuous area and check for wet/tacky/dry
there.
Remember how I
said I’d wait for the third coat to screw up? About 2/3 of the way through the final
coat paint suddenly started coming out of the gun in gobs. It was kinda funny
because I had to use all of my pilot training to stay calm, I was frantic about
wasting paint and finishing before the
paint dried, while at the same time freaking out about the failure mode of the
gun. Took it apart as far as I could, gave it a quick cleaning in case it was
gummed up paint. No difference, damn! Spray on the practice pieces, and I
figured out that the failure was when the trigger was pressed and released, but
once the paint was flowing it was Ok, so I gritted my teeth and kept going,
making a mess. Drying Aerothane is very sticky, so it quickly destroyed my
gloves but I was able to finish, hope I didn’t absorb too much through the skin.
The next day Dan showed me how the paint volume knob had gotten loose and was
on the verge of falling completely out of the gun, that would have been a
disaster I would not have been able to overcome, so thankfully it held together
just long enough. Lesson learned.


One worry I had
was spraying the leading/trailing edges from underneath, and I tried to find a
balance between too much and too little. I picked up the pieces the next day
and an examination showed that everything had gotten a good coat except the
stab leading edges, so those are going back in the booth for touch ups when I
do the fin.


I brought the
pieces back to the hangar, and I was feeling pretty good about the paint job,
people were stopping by and ooohhhing and ahhing, but to me they didn’t quite
look white enough, my eyes were telling me there was a silver tint to the white
but since everyone else was ooohhhing and ahhhing, I figured it must be my eyes.
About that time another pilot stopped by, the gent is an old time Alaska pilot
who has experience dripping out of his gray hair and beard, he’s a good guy and
has been keeping an eye on my complicated build, while I’ve enjoyed watching
his craftmanship rebuilding a Super Cub nearby whenever we each needed to take
a break from our respective projects. Walking into my hangar he took one look
and the conversation went something like this:
Hung them
vertically?
Yup.
Scared of runs?
Yup.
Scared of
spraying on too heavy?
Yup.
(he picks up a
piece and carries it outside in the sunlight)
Look silver to
you?
…..
Yup.


Shit. But
still, easier to fix too little than too much.
Next up: Moving the fuselage just to paint the fin.

....